Steel Structure Installation: Step-by-Step Erection Guide
Complete guide to steel structure installation. Learn the erection process, safety requirements, equipment needed, and timeline for steel building installation in 2026.
Proper installation is critical to the safety, durability, and performance of any steel structure building. Whether you're erecting a warehouse, factory, or commercial building, this guide walks you through the complete installation process.
At Laotie Steel Structure, we have installed 200+ buildings across 30+ countries. Here's everything you need to know.
Pre-Installation Preparation
1. Foundation Inspection
Before any steel arrives on site, the concrete foundation must be inspected:
- Concrete strength: Minimum 70% of design strength (typically C30)
- Anchor bolt accuracy: Position tolerance ±2mm, elevation tolerance ±3mm
- Foundation dimensions: Verify all dimensions against the erection drawing
- Embedded parts: Check alignment of column base plates
2. Site Preparation
- Level the site (maximum slope 1:50)
- Prepare access roads for trucks and cranes
- Set up temporary power and water supply
- Designate material storage area (raised 20cm above ground)
- Install temporary fencing and safety signage
3. Equipment & Tools Required
| Equipment | Specification | Quantity |
|---|---|---|
| Crawler crane / Truck crane | 25-100 ton | 1-2 units |
| Mobile scaffolding | 6-12 meter height | As needed |
| High-strength bolts (10.9S) | M20-M30 | Per drawing |
| Torque wrench | 1000-3000 N·m | 2-4 units |
| Safety harness & lifelines | GB/EN certified | 1 per worker |
| Leveling instruments | Precision ±1mm/10m | 1-2 units |
Step-by-Step Installation Process
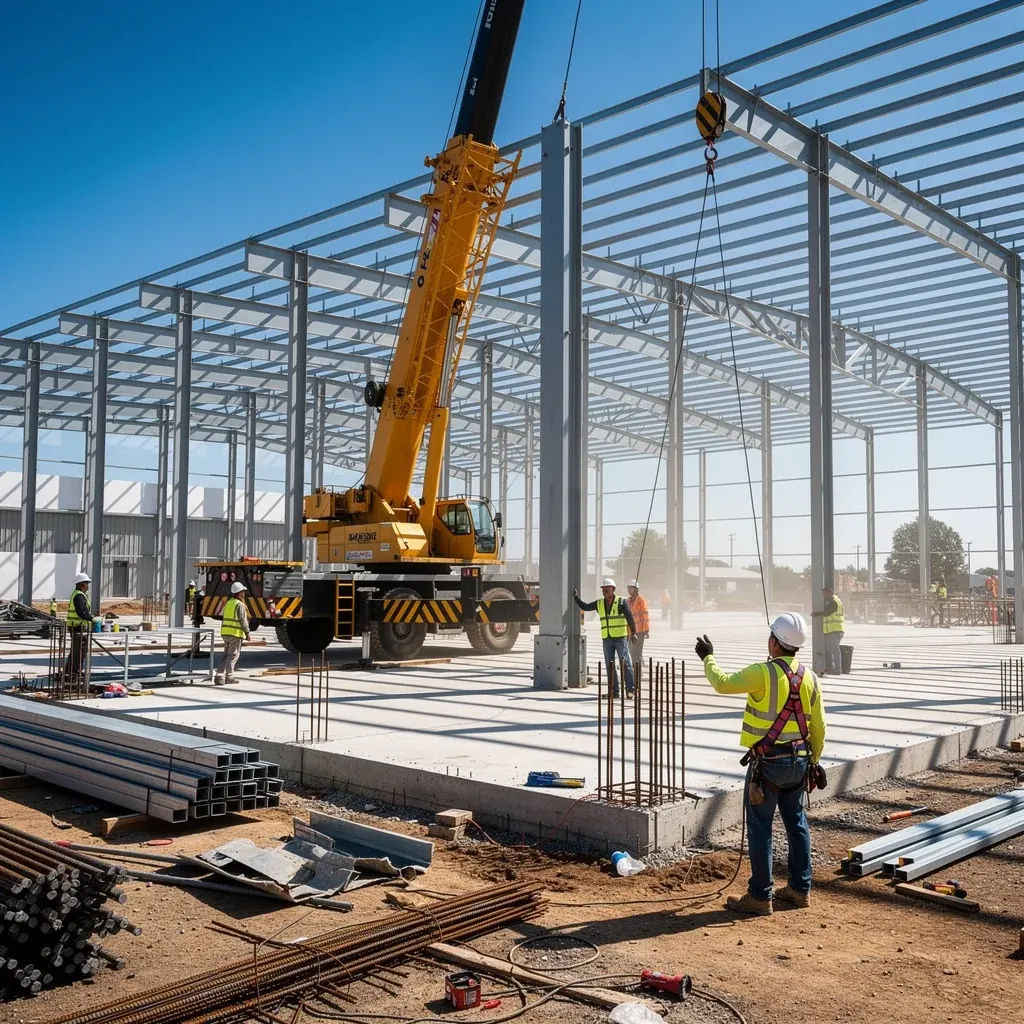
Phase 1: Column Erection (Days 1-3)
Step 1: Mark foundation centerlines Use a theodolite or total station to mark exact column positions on the foundation.
Step 2: Lift & position first column
- Attach slings at 60-70% of column height
- Lower onto anchor bolts slowly
- Insert all anchor bolts but do not fully tighten
- Use temporary guy ropes for stability
- Install 2-3 columns before tightening any anchor bolts
- Connect with crane beam (if any) for temporary stability
- Check verticality with plumb bob or theodolite (tolerance: H/1000, max 10mm)
- Install cross bracing between columns
- Tighten anchor bolts to 70% design torque
- Re-check verticality
Phase 2: Beam & Roof Installation (Days 4-10)
Step 5: Install main crane beams / roof beams
- Lift beams in sequence (typically from end bay)
- Use temporary supports if span > 24m
- Connect with high-strength bolts (finger-tight first, then torque to spec)
- Install roof purlins immediately after each beam section
- Diagonal bracing in roof plane
- Tension rods / cable bracing
- Check roof plane flatness (tolerance: ±5mm)
- C/Z purlins at 1.2-1.5m spacing
- Bracing between purlins
- Verify roof slope matches drawing (typically 5-10%)
Phase 3: Wall & Cladding (Days 11-18)
Step 8: Install wall columns / girts
- Vertical girts at 1.5-2.0m spacing
- Check straightness with string line
- Start from bottom, work upward
- Overlap direction: downward for walls, weather-side up for roof
- Self-drilling screws at every purlin/girt intersection
- Seal all joints with butyl tape
- Single-skin: corrugated or trapezoidal sheet
- Sandwich panel: install from eaves to ridge
- Ridge capping and flashings
- Verify waterproofing at all penetrations (vents, skylights)
Phase 4: Finishing & Inspection (Days 19-21)
Step 11: Tighten all bolted connections
- Final torque check on all high-strength bolts
- Torque value: per design (typically 1550-2700 N·m for M24 10.9S)
- Mark all tightened bolts with paint pen
- Roll-up doors / sliding doors
- Eave vents, ridge vents
- Gutters and downpipes
- Dimensional check (overall length/width/height ±10mm)
- Bolt tightness check (10% random sampling)
- Paint touch-up on damaged areas
- Hand over with as-built drawings and warranty certificate
Installation Timeline (Reference)
| Building Size | Preparation | Erection | Cladding | Finishing | Total |
|---|---|---|---|---|---|
| 500 m² warehouse | 2 days | 5 days | 5 days | 3 days | ~15 days |
| 2000 m² factory | 3 days | 10 days | 10 days | 5 days | ~28 days |
| 5000 m² logistics center | 5 days | 20 days | 20 days | 7 days | ~52 days |
Safety Requirements (Non-Negotiable)
- ✅ 100% of workers must have safety training before site entry
- ✅ Safety harness mandatory above 2m height
- ✅ Crane operator must hold valid license
- ✅ Wind speed > Level 6 (13.8 m/s): stop crane operations
- ✅ Rain/snow: stop welding and high-altitude work
- ✅ Daily safety briefing before work starts
Laotie Installation Support Services
We don't just manufacture — we support your installation success:
| Service | Description |
|---|---|
| Erection drawings | Complete bolt lists, connection details, torque specs |
| Installation manual | Step-by-step PDF in English/Spanish/French |
| Engineer on-site | Dispatch Chinese engineer to supervise (optional) |
| Video support | Daily WhatsApp video call for remote guidance |
| Spare parts kit | 2% extra bolts, screws, sealant included free |
Common Installation Mistakes to Avoid
| Mistake | Consequence | Prevention |
|---|---|---|
| Anchor bolts not surveyed before erection | Columns won't fit | 100% re-check foundation before shipping |
| Tightening bolts too early | Structure can't self-align | Tighten only after full bay is erected |
| Ignoring torque sequence | Uneven load distribution | Follow cross/star pattern torque sequence |
| Cladding overlap direction wrong | Water leakage | Train team with our installation video |
| No temporary bracing | Collapse during construction | Install bracing before crane leaves |
Get Your Installation Support Plan
Every Laotie order includes:
- ✅ Complete erection drawings (AutoCAD + PDF)
- ✅ English installation manual (80+ pages)
- ✅ WhatsApp video support (daily during installation)
- ✅ Optional: on-site engineer dispatch
*Laotie Steel Structure — Your trusted partner from factory to finished building.*
Related Articles
Steel Structure for Cold Storage Warehouse: Design, Insulation & Cost Guide
Complete guide to steel structure cold storage warehouses. Learn about insulated panel systems, vapor barriers, floor design, refrigeration integration, and cost per square meter.
How to Build a Steel Warehouse: Step-by-Step Guide (2026)
Learn how to build a steel warehouse step by step: planning, design, fabrication, shipping, foundation, erection. Complete timeline and checklist.
Need a Steel Structure?
Get a free quote from our engineering team. We respond within 2 hours.
Request a QuoteStay Updated
Get steel structure tips, cost guides, and industry insights delivered to your inbox.
No spam. Unsubscribe anytime.